How To Load A Price Tagging Gun
Price tagging guns, also known as tagging guns or price guns, are essential tools for retail stores, boutiques, and even home businesses. They streamline the process of attaching price labels, tags, or barcodes to products, making inventory management more efficient. But, if you've just purchased a price-tagging gun and are wondering how to load it properly, you’re in the right place.
Step-by-Step Guide: How to Load a Price Tagging Gun
Before you start loading your price tagging gun, make sure you have everything you need: the price tagging gun itself, a roll or stack of price tags, and replacement needles (if necessary). Check that you have the right type of tags and attachments, as different guns may require specific tags.
Step 1: Prepare the Tagging Gun
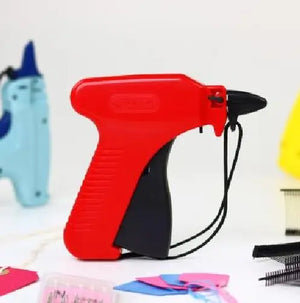
Hold the gun firmly in your hand, ensuring the trigger is easily accessible. Identify the tag holder area, which is usually located at the top or front of the gun.
Step 2: Load the Price Tags
Locate the slot or compartment for loading the tags. This is often found at the back or side of the gun. Open the compartment by pressing a latch or sliding a cover, depending on the model. Place the price tag roll or stack inside the compartment, ensuring the tags face the right direction. Close the compartment securely.
Step 3: Insert the Needle and Attachments
Most price-tagging guns use a needle to puncture and attach tags to items. Check if your gun's needle is intact and securely in place. If not, follow the manufacturer's instructions to insert a new needle. Insert the attachment strip (plastic fasteners) into the gun's attachment slot, ensuring they are aligned properly.
Step 4: Test the Gun
Once everything is loaded, test the gun by squeezing the trigger a few times. This action should push a tag through the needle and attach it to a test item. If it works smoothly, you're ready to start tagging your products.
Step 5: Start Tagging Your Products
Now that your price-tagging gun is loaded and tested, you can begin tagging your items. Position the needle where you want the tag to be attached, squeeze the trigger firmly, and release it. Repeat this process for all your products.
Why It's Important to Load a Price Tagging Gun Correctly
Loading your price-tagging gun correctly ensures it functions smoothly, reduces the risk of jams, and prevents damage to both the gun and your merchandise. Proper loading also improves efficiency, saving time and reducing frustration for your staff.
Top Tips for Using a Price Tagging Gun Efficiently
- Keep the Gun Clean: Regularly clean your price tagging gun to prevent dust and debris from causing jams.
- Replace Needles as Needed: A blunt or bent needle can damage tags or fabric. Replace them regularly for best results.
- Store Properly: When not in use, store your price tagging gun in a dry, cool place to prevent rust or damage.
Loading a price tagging gun is a straightforward process that, once mastered, makes your tagging tasks quick and efficient. Whether you're running a small shop or managing inventory for a large store, understanding how to properly load and maintain your price tagging gun will save you time and help keep your operation running smoothly. Follow the steps outlined in this guide, and you’ll be a price-tagging pro in no time!
By focusing on both the technical aspects of loading a price-tagging gun and answering common questions, this blog provides comprehensive guidance for beginners and seasoned retail professionals alike.
FAQ’s
- How do I know if my price tagging gun is compatible with a specific type of tag?
Always check the manufacturer's instructions or specifications for compatibility. Most guns are designed to work with specific types of tags and attachments.
- How often should I replace the needle on my price-tagging gun?
Replace the needle when it becomes dull or bent, or if you notice it tearing or damaging tags or fabrics.
- What should I do if my price tagging gun jams?
If your gun jams, carefully remove any stuck tags or attachments. Refer to the manufacturer's manual for guidance on clearing jams safely.
- Can I use my price tagging gun on delicate fabrics?
Yes, but use fine needles designed for delicate fabrics to avoid causing damage.
- Why is my price tagging gun not attaching tags properly?
This could be due to an incorrectly loaded tag roll, a bent needle, or worn-out attachments. Check all these elements and replace or adjust as needed.
- What are the different types of price-tagging guns available?
There are mainly two types: standard and fine fabric guns. Standard guns are for thicker materials, while fine fabric guns are ideal for delicate fabrics.
- Can I use a price-tagging gun for barcodes?
Yes, some guns can be used to attach barcode tags, provided the tags are compatible with the gun.
- How do I maintain my price tagging gun?
Regularly clean the gun, check for worn parts, and replace them as needed. Store the gun in a safe, dry place.
- Is it easy to reload a price-tagging gun?
Yes, once you get the hang of it, reloading is straightforward. Follow the steps outlined above, and you’ll be reloading in no time.
- What should I do if my price tagging gun breaks?
Contact the manufacturer for repair options or consider purchasing a new one if repairs are not feasible.
- How many tags can a price tagging gun hold?
This depends on the model. Most guns can hold several hundred tags at once.
- Do I need any training to use a price-tagging gun?
No formal training is required. However, reading the instructions and practising on a few items first is recommended.
- Are there safety concerns when using a price-tagging gun?
Always handle the needle carefully to avoid injury, and keep the gun out of reach of children.
- Can price-tagging guns be used outdoors?
Yes, but ensure they are kept dry and away from extreme temperatures to prevent damage.
- What is the average cost of a price-tagging gun?
Prices vary based on the brand, type, and quality. Entry-level models can start as low as £10, while professional models can cost upwards of £50.

